Tampilkan postingan dengan label vegetables. Tampilkan semua postingan

Rabu, 11 Februari 2015

Easy Cheddar Cheese Sauce for Vegetables

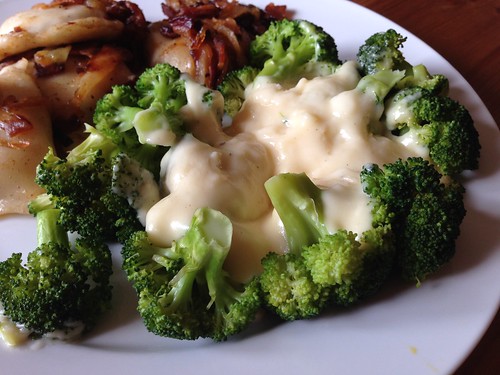
We all love pierogies but it had been ages since I'd served them for dinner. I always serve them with bacon and caramelized onions, with a big dollop of sour cream. And I always serve steamed broccoli on the side. This time I wanted to do something a little different with the broccoli. Enter this Easy Cheddar Cheese Sauce for Vegetables.

Easy cheese sauce

This is the same sauce you'd make for mac and cheese. It's an easy sauce to make and was really good with the steamed broccoli. I thought the original recipe was a bit thick, so I've halved the butter and flour in the recipe below.

Easy Cheddar Cheese Sauce for Vegetables
As seen on Iowa Girl Eats

1 tablespoon butter
1 tablespoons flour
salt and pepper
1 cup milk
1-1/2 cups freshly shredded cheddar cheese

Melt butter in a saucepan over medium heat. Add flour and whisk for one minute.

Slowly whisk in milk then season with salt and pepper and switch to a wooden spoon. Stir and cook until thickened, about 4-5 minutes.

Turn off heat and add cheese. Stir until melted and smooth. Taste then season with additional salt and pepper if necessary. Serve immediately.

Rabu, 26 November 2014

Collard Greens

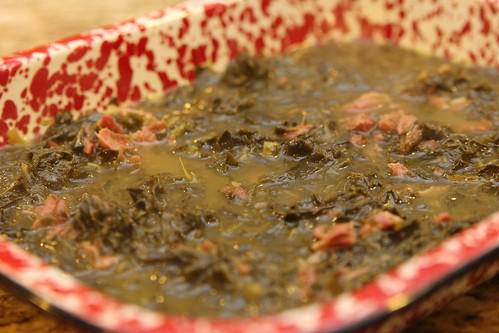
I love collard greens but the last time I tried to make them they were inedible. So. Much. Salt. I vowed to try again for our Southern night redo. This time I pretty much eliminated the salt from the recipe and I nailed it!


These were perfect with fried chicken, mac and cheese and cornbread. It takes some time to prep the collard greens but since you have to boil the water for an hour that's the perfect time to get it done. These were just as good as the ones we get from our favorite BBQ spot - a little spicy and so flavorful.

Collard Greens
Modified from Paula Deen

1 smoked ham hock
1 tablespoon seasoned salt
1/4 teaspoon black pepper
1/2 teaspoon garlic powder
a few dashes Tabasco sauce
1 large bunch collard greens
1 tablespoon butter

In a large pot, bring 3 quarts of water to a boil. Add the ham hock, seasoned salt, black pepper, garlic powder and hot sauce. Reduce heat to medium and cook for 1 hour.

While the water is boiling, wash the collard greens thoroughly. Remove the stems that run down the center by holding the leaf in one hand and stripping the leaf down with your other hand. The tender young leaves in the heart of the collards don't need to be stripped.

Once all the leaves have been washed and dried, stack 6 to 8 leaves on top of one another, roll them up, and slice into 1/2 to 1-inch thick slices.

After the water cooks for an hour, put the greens in the pot and add the butter. Cook for 45 to 60 minutes, stirring occasionally. Taste and adjust the seasoning, if needed. If you want, you can remove the ham hock, allow to cool and pick the meat off the bone. Add the meat to the collard greens and stir to combine before serving.

Rabu, 09 Juli 2014

Pasta with Smashed Peas, Sausage, and Ricotta Cheese

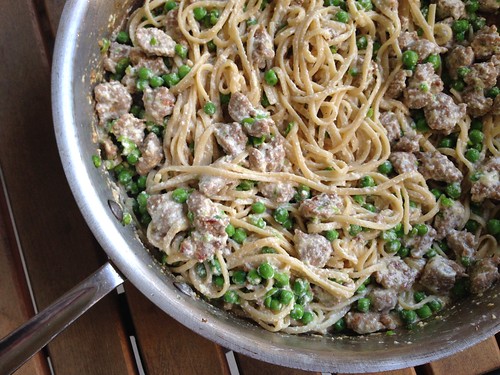
We had an almost-full container of ricotta cheese in the fridge, so I asked SP to search for a recipe to use it up. He found this one for Tagliatelle with Smashed Peas, Sausage, and Ricotta Cheese that sounded both easy and delicious.

Linguine with sausage, peas and ricotta

Like I do with most pasta recipes these days, I only used a half pound instead of the full pound. Cutting down on the pasta while keeping the filler ingredients the same is an easy way for us to get our pasta fix without going overboard. I also cut the peas down from a full pound to a half pound because, wow a pound is a lot of peas. SP wanted the sauce to be smoother. We couldn't taste the ricotta at all, which was disappointing, but we still enjoyed it.

Pasta with Smashed Peas, Sausage, and Ricotta Cheese
Giada De Laurentiis

1/2 pound fresh or dried tagliatelle pasta (or other wide, long pasta)
2 tablespoons olive oil
2 cloves garlic, chopped
1 pound hot Italian sausage, casings removed
1/2 pound frozen peas, thawed
1 cup whole milk ricotta cheese
1 bunch fresh basil leaves chopped (about 3/4 cup)
1/4 cup fresh grated Pecorino Romano cheese
salt and pepper, to taste

Bring a large pot of salted water to a boil over high heat. Cook the pasta according to package directions. Drain, reserving 1 cup of the pasta cooking water.

Meanwhile, in a large, heavy skillet heat the olive oil and garlic over medium-high heat and add the sausage. Use a wooden spoon to break up the sausage into bite-sized bits.

Once the sausage has browned, about 5 minutes, remove and set aside. Add the peas to the pan and, using the back of the wooden spoon, smash the peas.

Turn off the heat. Add the ricotta cheese along with the cooked pasta and toss to coat, adding the pasta cooking water in 1/4 cup additions, if needed, to make the pasta moist. Return the sausage to the pan. Add the basil, Pecorino Romano cheese, and salt. Toss gently to coat and serve immediately

Jumat, 20 Juni 2014

Cooler Corn on the Cob

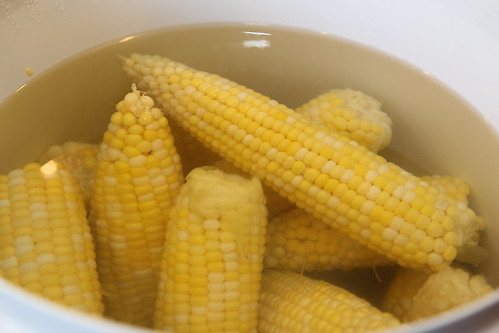
For our recent BBQ-themed dinner with C&T we had something I'd never heard of before - cooler corn on the cob. T had seen the idea on Pinterest when looking for camping meal ideas and figured it would be fun to try for our backyard BBQ. This would be awesome for parties - you can make a large amount of perfectly-cooked corn in no time flat and it keeps warm for hours.

Untitled
Photo credit - T. Casey

The "recipe" is not really a recipe, just a method, but I had to share it with you guys. I'm going to offer to bring cooler corn to the next BBQ we're invited to, just to try it out for myself.

Cooler Corn on the Cob

1 cooler (small or large depending on how much corn you're making)
Corn on the cob

Wash the cooler well. Shuck the corn, removing all the outer levels and silk. Place the shucked corn in the cooler.

Bring a large pot of water to a boil. Pour over the corn. You want to submerge the corn. Close the lid of the cooler and let it sit for at least 30 minutes.

The corn can sit in the cooler for a couple hours. When you're ready to eat, just drain off the water and enjoy.

Jumat, 16 Mei 2014

Pasta Primavera

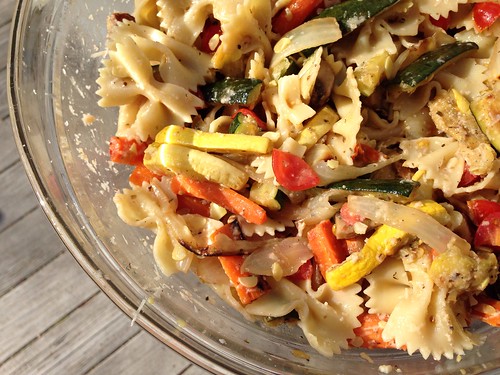
I've been making this Pasta Primavera recipe for years but for some reason I haven't blogged it yet. It's a great way to get plenty of veggies in your diet yet it's easy enough to make on a weeknight. It can be served hot, cold or room temperature, making it great for parties. I served this to my parents for a recent Sunday dinner and the 5 of us put away the whole bowl in one sitting.

Pasta primavera

Pasta Primavera
From Giada De Laurentiis

3 carrots, peeled and cut into thin strips
2 medium zucchini or 1 large zucchini, cut into thin strips
2 yellow squash, cut into thin strips
1 onion, thinly sliced
1 yellow bell pepper, cut into thin strips
1 red bell pepper, cut into thin strips
1/4 cup olive oil
Kosher salt and freshly ground black pepper
1 tablespoon dried Italian herbs or herbes de Provence
1 pound farfalle (bowtie pasta)
15 cherry tomatoes, halved
1/2 cup grated Parmesan

Preheat the oven to 450 degrees F.

On a large heavy baking sheet, toss all of the vegetables with the oil, salt, pepper, and dried herbs to coat. Transfer half of the vegetable mixture to another heavy large baking sheet and arrange evenly over the baking sheets. Bake until the carrots are tender and the vegetables begin to brown, stirring after the first 10 minutes, about 20 minutes total.

Meanwhile, cook the pasta in a large pot of boiling salted water until al dente, tender but still firm to the bite, about 8 minutes. Drain, reserving 1 cup of the cooking liquid.

Toss the pasta with the vegetable mixtures in a large bowl to combine. Toss with the cherry tomatoes and enough reserved cooking liquid to moisten. Season the pasta with salt and pepper, to taste. Sprinkle with the Parmesan and serve immediately.

Jumat, 28 Maret 2014

Recipe Redo: Creamed Spinach

I've been making my friend Melissa's recipe for creamed spinach for years but was never able to get a good photo of the finished product. SP has been hankering for a good steak dinner. Unfortunately there aren't any great steak places nearby that offer a consistently good meal, so we decided to make our own dinner at home. We have a fantastic Amish butcher at a local farmer's market so we picked up some steaks and I whipped up this creamed spinach.

Untitled

Of course I forgot that I wanted to blog the creamed spinach on its own, so this Instagram photo is the best shot I got that night. Trust me, this is a recipe you want to have in your back pocket. It's easy and delicious. The original Emeril recipe calls for fresh spinach, but I always use frozen since finding 2lbs worth of fresh spinach without breaking the bank can be difficult. Frozen is just as good and makes this a side dish I can throw together whenever the mood strikes.

Creamed Spinach
As seen on Alosha's Kitchen, modified from Emeril Lagasse

2 cups frozen spinach
2 tablespoons unsalted butter
1 shallot, finely minced
2 cloves garlic, minced
3/4 teaspoon salt
1/2 teaspoon freshly ground black pepper
1/4 teaspoon nutmeg
1/2 - 1 cup heavy cream

Place the frozen spinach in a microwave-safe bowl and cook for a few minutes (will vary depending on your microwave) until just defrosted. Place in a clean kitchen towel and wring out all the excess water in the spinach.

Melt the butter in a medium saute pan over medium-high heat. Add the shallots and garlic and cook, stirring, until soft and fragrant, about 2 minutes. Add the spinach and cook, stirring, just until the liquid is released. Add the cream (start with 1/2 cup), salt, pepper, and nutmeg, and cook until the cream is reduced by half, about 4 minutes. You may want to add more cream if it looks dry. Remove from the heat and serve immediately.

Rabu, 05 Maret 2014

Salad with Pancetta, Pepperoncini and Parmesan

I was looking for something different to serve alongside the Breakfast Risotto I made a few weeks ago. I remembered Bridget's recipe for Salad with Pancetta, Peperoncini and Parmesan and figured it would be perfect since both recipes called for pancetta.

Untitled

We all enjoyed this salad, although the peperoncini were a bit too spicy for Baby Girl. It's a very simple salad that packs great flavor. Baby Girl was popping the pancetta like candy and really enjoyed the dressing.

Salad with Pancetta, Peperoncini, and Parmesan
As seen on The Way the Cookie Crumbles

Dressing:
2 cloves garlic
1/2 teaspoon salt
1/2 teaspoon pepper
1 1/2 tablespoons fresh lemon juice
1 teaspoon Worcestershire sauce
1 teaspoon Dijon mustard
1/4 cup extra virgin olive oil

Salad:
2 romaine hearts, washed and chopped
8 peperocini, stems removed, chopped fine
6 ounces pancetta, cooked and crumbled
1/2 cup (1 ounce) shredded parmesan

For the dressing: Heat a small nonstick skillet over medium heat. Add the garlic cloves in their peels and allow to toast, turning often, until the peel starts to blacken in spots, about 5 minutes. Allow to cool, then remove the peel and mince the garlic. Combine the garlic with the rest of the dressing ingredients.

For the salad: Mix everything together, then toss with the dressing.

Senin, 03 Maret 2014

Crispy Black Bean Tacos with Feta and Slaw

Sometimes I'll put a dish on our weekly meal plan that makes SP nervous. He's always game to try anything I make and he's the first to say, "I trust you because you're a good cook" but we all know that sometimes a recipe can sound good on paper but not taste so great in person.

Untitled

These Crispy Black Bean Tacos with Feta and Slaw were one of those dishes that initially made him wary. When I told him the name of the dish he gave me that side-eye look of his that lets me know he's reserving judgement. I think it was the corn tortillas - neither of us are big fans of corn tortillas, but I knew frying them in a bit of oil would completely change their texture for the better.

Untitled

I'm happy to report that he loved these tacos, as did I. Baby Girl was also a huge fan. Per usual, she wanted to taste the black bean mixture and snacked on the broccoli slaw as I was getting everything prepped. Like Elly says, these are an awesome weeknight meal because there's very little prep work or cooking needed. I'm so happy SP loved this dish because I can't wait to make it again.

Crispy Black Bean Tacos with Feta and Slaw
As seen on Elly Says Opa, from Bon Appetit
Makes 8 tacos

1 (15 oz.) can black beans, drained and rinsed
1/2 teaspoon cumin
salt and pepper
1 1/2 cups broccoli slaw mix
2 teaspoons olive oil
1 tablespoon lime juice
2 scallions, thinly sliced
1/3 cup chopped cilantro
vegetable or canola oil
8 white or yellow corn tortillas
crumbled feta cheese
Bottled hot sauce for serving

Place the beans, cumin, and salt and pepper to taste in a bowl and partially mash.

In another bowl, toss the broccoli slaw mix with olive oil, lime juice, scallions and cilantro. Season to taste with salt and pepper, and set aside.

Heat about 3 teaspoons of the vegetable or canola oil in a large nonstick skillet over medium-high heat. Add as many tortillas as you can fit in a single layer. Move the tortillas around in the pan so they're all evenly coated with oil on both sides. After one side is golden brown, flip the tortillas over and spoon some of the bean mixture onto one half of each tortilla. Cook for about 1 minute. Fold the tacos in half and cook until golden brown and crispy, 1-2 minutes per side.

Remove the tacos to a paper towel-lined plate and drain off any excess oil. Open the tortilla and stuff with some of the slaw and crumbled feta. Repeat the process with the remaining tortillas, adding more oil to the pan, as needed. Top with hot sauce, if desired, before serving.

Jumat, 13 Desember 2013

Recipe Swap: Leek and Pea Risotto

Time for another recipe swap! This month's theme was Blogger's Choice, which means we can pick any recipe from our assigned blog. I got my friend Mary Ellen's blog and let me tell you, I had a REALLY hard time picking a recipe to make. I've already made quite a few of her things and I just couldn't narrow down what I wanted to make. Did I want chicken, tofu, vegetarian, breakfast? I had no idea. Everything sounded good. Finally I decided to make a risotto since Mary Ellen has said numerous times that it's her favorite thing to make. I chose this Leek and Pea Risotto because I had some leeks I needed to use up and I always have frozen peas on hand.

leek and pea risotto2

The only change I made was to leave the leeks in the pan while I cooked the rice rather than removing them, which may have been a mistake. SP said he couldn't taste the leeks at all, so maybe they'd have been more pronounced if they hadn't cooked down so much. Even so, this was outstanding. I really love risotto and it's so easy to make. I don't know why it has such a bad reputation for being difficult.

leek and pea risotto

I served the risotto with crispy pork chops - I pounded the pork very thin then breaded it with egg and panko bread crumbs, then shallow-fried them in some vegetable oil. They were the perfect accompaniment. This was an outstanding dinner. I can't wait to make more versions of risotto. Check out Mary Ellen's risotto tab for more recipe ideas.


Leek and Pea Risotto
As seen on Mary Ellen�s Cooking Creations

6 cups chicken broth
3 tablespoons extra-virgin olive oil
2 medium leeks (white and pale green parts only), thinly sliced and washed
1 1/4 cups Arborio rice
1/4 cup dry white wine
1/2 cup frozen peas
2 tablespoons unsalted butter (I didn't use this)
1/3 cup grated Parmigiano-Reggiano

Bring stock to a simmer in a medium saucepan, then keep at a low simmer.

Cook leeks in 2 tablespoons oil in a 4-quart heavy pot over medium heat, stirring occasionally, until softened but not browned, 7 to 8 minutes. Transfer to a plate.

Add remaining tablespoon oil and rice to pot and cook, stirring constantly, until rice is coated evenly, about 1 minute.

Add wine and simmer, stirring, until most has been absorbed, about 1 minute.

Add 1 cup hot stock to the pan. Stir constantly until stock has been absorbed. Continue simmering and adding hot stock, 1 cup at a time, stirring constantly and allowing each addition to be absorbed before adding the next, until 1 cup stock is left, 15 to 18 minutes.

Add peas, leeks, and remaining cup of stock and cook, stirring, until rice is just tender, 3 to 5 minutes.

Stir in butter and cheese then remove from heat.

To check out what the other bloggers chose click the links below:


Rabu, 11 Desember 2013

Roasted Carrots

I feel like I'm in a vegetable rut. I always make the same things over and over again. I've never been a huge fan of carrots but I do like them roasted. In the interest of changing up our routine I went on a hunt for an easy recipe to make one night and found these Roasted Carrots.

roasted carrots

Simple and delicious. It takes hardly any time at all to prepare these and then the oven does all the work.

Roasted Carrots
Recipe from Pastor Ryan

3 lbs carrots, peeled
1/4 cup olive oil
2 teaspoons fresh thyme
salt and pepper, to taste
4 scallions, minced

Preheat the oven to 400 degrees.

If the carrots aren't all the same size, cut them down the middle lengthwise into same-size pieces. Lay them on a sheet pan or in a baking dish and drizzle with olive oil. Sprinkle with the fresh thyme, salt and pepper.

Bake for 35-40 minutes until they're soft. Sprinkle with chopped scallions and serve.

Senin, 02 Desember 2013

Roasted Green Beans

I love to roast vegetables but I never thought to roast green beans until the girls on my cooking board mentioned it. And it couldn't be simpler - toss with seasonings and oil and roast until tender.

Roasted green beans

There are a ton of variations - my cooking board mentioned adding onions or mushrooms, garlic, various spices, even soy sauce and orange juice for an Asian spin - but so far I've only done oil, salt and pepper. I'll definitely be experimenting soon, though.

Recently I roasted 2lbs of green beans for 5 adults and 1 child and we had very few leftover. They're so addicting we kept going back for more.

Roasted Green Beans

2lbs green beans
2 tablespoons olive oil
salt and pepper

Preheat the oven to 425 degrees.

Trim the ends off the green beans and place in a 9 x 13" baking dish. Add the oil and season with salt and pepper. Toss to coat all the beans evenly.

Bake for 10-15 minutes or until the beans are tender and starting to brown in spots. Every few minutes give them a toss with tongs.

Rabu, 27 November 2013

Cauliflower Gratin

This was one of two side dishes I served with the turkey meatloaf - Ina's Cauliflower Gratin. Cauliflower isn't a vegetable I cook with regularly, but it's a great alternative to broccoli or other cold-weather vegetables. And bonus, SP and Baby Girl both love it.

Cauliflower gratin2

When I think of gratins I think of heavy, cream-laden dishes but this was surprisingly light. The sauce is made with milk, not cream, and there's only 4 tablespoons of butter for a 3-lb head of cauliflower.

Cauliflower gratin

We all loved this. I can't wait to experiment with more cauliflower dishes this winter.

Cauliflower Gratin
Recipe from Ina Garten

1 (3-pound) head cauliflower, cut into large florets
Kosher salt
4 tablespoons (1/2 stick) unsalted butter, divided
3 tablespoons all-purpose flour
2 cups milk
1/2 teaspoon freshly ground black pepper
1/4 teaspoon grated nutmeg
3/4 cup freshly grated Gruyere, divided
1/2 cup freshly grated Parmesan
1/4 cup fresh bread crumbs (from one slice of bread)

Preheat the oven to 375 degrees.

Cook the cauliflower florets in a large pot of boiling salted water for 5 to 6 minutes, until tender but still firm. Drain.

Meanwhile, melt 2 tablespoons of the butter in a medium saucepan over low heat. Add the flour, stirring constantly with a wooden spoon for 2 minutes. Pour the milk into the butter-flour mixture and stir until it comes to a boil. Boil, whisking constantly, for 1 minute, or until thickened. Off the heat, add 1 teaspoon of salt, the pepper, nutmeg, 1/2 cup of the Gruyere, and the Parmesan.

Pour 1/3 of the sauce on the bottom of a 2 1/2-quart baking dish. Place the drained cauliflower on top and then spread the rest of the sauce evenly on top. Combine the bread crumbs with the remaining 1/4 cup of Gruyere and sprinkle on top. Melt the remaining 2 tablespoons of butter and drizzle over the gratin. Sprinkle with salt and pepper.

Bake for 25 to 30 minutes, until the top is browned. Serve hot or at room temperature.

Rabu, 06 November 2013

Sponsored Post: Campbell's Dinner Sauces

This is a sponsored post. All opinions are my own.

Recently I was selected to try the new Campbell's Dinner Sauces. The tagline is "Make an awesome weeknight dinner in just 15 minutes" by browning meat, adding the sauce and serving over pasta or rice. I was excited to try it out.

Thai green curry chicken2

I couldn't choose between the different flavors (the Campbell�s Skillet Sauces are available in Marsala, Toasted Sesame, Scampi and Thai Green Curry), so I asked SP which he preferred. He immediately chose the Thai green curry, which ended up being a good thing because when he went to the store to buy it that was the only flavor they had on the shelf. They've since added the rest of the line-up at our supermarket, however.

I wanted to make this a complete meal, so I opted to add some vegetables in with chicken and sauce. I chose potatoes, onions and zucchini, but you could also add mushrooms, green beans, squash, etc.

Thai green curry chicken

I was a little skeptical as I was cooking dinner, thinking the flavors would be watered down to be palatable to a wider audience, but we all enjoyed this. It had a nice kick and the green curry flavor really came through, but it wasn't too spicy for Baby Girl. I loved the addition of the veggies, although adding them in did take this from a 15 minute meal to a 30 minute meal.

Campbell's also has a line of slow cooker sauces: Tavern Style Pot Roast, Sweet Korean BBQ, Apple Bourbon BBQ, Hawaiian Luau, Mexican Red Chile Taco and Moroccan Spiced Stew. If I ever get myself a new slow cooker I'd love to try a few of those.

You can check out Campbell's Dinner Sauces on their website and on Facebook.

Thai Green Curry Chicken with Vegetables

4 small-medium Yukon gold potatoes, peeled and cut into chunks
1 tablespoon vegetable oil
1lb chicken breasts, cut into chunks
1 zucchini, cut into chunks
1 small onion, cut into chunks
1 pouch Campbell's Thai Green Curry sauce
rice, for serving

Boil the potatoes in salted water until just tender. Drain and set aside.

Heat the oil in a large non-stick skillet over medium-high heat. Add the chicken and cook until browned on all sides. Remove to a bowl and set aside. Add the zucchini and onion to the pan and cook until soft, about 5 minutes. Add the chicken back into the pan, along with the potatoes and green curry sauce. Simmer according to package directions.

Serve over rice.


This post brought to you by Campbell�s Dinner Sauces. Weekend-worthy dinners with only weekday-level effort needed! Learn more at http://www.campbellsauces.com/.

Rabu, 18 September 2013

Collard Greens

We got together with some friends recently and the theme was Southern cooking. One of the dishes I was tasked with making was collard greens. I love collards at our favorite BBQ place so I looked for a similar recipe.

collards

These had awesome flavor but were incredibly salty, so much so that they were basically inedible. As a result I modified the recipe below, omitting the salt in Paula's house seasoning. I'll definitely be making these again with the modification. They really were delicious, even if the picture doesn't do them justice.

Collard Greens
Recipe modified from Paula Deen

1/2 pound smoked meat (ham hocks, smoked turkey wings, or smoked neck bones)
1 teaspoon black pepper
1 teaspoon garlic powder
1 tablespoon seasoned salt
1 tablespoon hot red pepper sauce
1 large bunch collard greens
1 tablespoon butter


In a large pot, bring 3 quarts of water to a boil and add smoked meat, black pepper, garlic powder, seasoned salt and hot sauce. Reduce heat to medium and cook for 1 hour.

Wash the collard greens thoroughly. Remove the stems that run down the center by holding the leaf in your left hand and stripping the leaf down with your right hand. The tender young leaves in the heart of the collards don't need to be stripped. Stack 6 to 8 leaves on top of one another, roll up, and slice into 1/2 to 1-ince thick slices.

Place greens in pot with meat and add butter. Cook for 45 to 60 minutes, stirring occasionally. When done taste and adjust seasoning. Remove the meat from the ham hock, etc. and add to the collards.


Rabu, 11 September 2013

Tropical Chicken Kabobs

As summer winds down I've been thinking back to some of my favorite summer meals. One thing I loved this summer were skewers. My favorite was definitely the Bang Bang Chicken Skewers, but really you can thread some meat and veggies on skewers, grill them up and my family will devour them. These Tropical Pork Kabobs were no exception.

tropical skewers

I rarely cook pork so the first thing I did was swap it out for chicken. I also prefer to keep each ingredient on its own skewer(s) since they have different cooking times. I goofed and forgot to defrost the chicken early enough to marinate it overnight, something I highly recommend so the flavors have time to really seep into the meat.

tropical skewers2

We all enjoyed this with couscous. There really is nothing like grilled meat and veggies in the summer.

Tropical Chicken Kabobs
As seen on The Barbee Housewife, from So Tasty, So Yummy

1/4 cup soy sauce
1/4 cup pineapple juice
1 tablespoon rice wine vinegar
2 cloves garlic, crushed
1 teaspoon chili garlic sauce
1 tablespoon brown sugar
1 lb. chicken breasts, cut in 1 inch cubes
1 pineapple or 1 20 oz. can, cut in 1 inch cubes
1 onion, cut in 1 inch cubes
1 zucchini, cut in 1/2 inch pieces
1 pint grape tomatoes
1/2 lb. whole button mushrooms

In a medium bowl, whisk together the soy sauce, pineapple juice, rice wine vinegar, garlic, chili garlic sauce, and brown sugar. Reserve 3 tablespoons of the marinade. Place the chicken and the marinade, in a plastic bag, keeping the reserved aside. Marinate overnight.

Pre-heat the grill. Skewer the chicken, pineapple, onion, zucchini, tomatoes and mushrooms. Place the skewers on the grill, baste with the reserved marinade every time you turn the skewers. Cook until the chicken is done, about 6 minutes per side. Let rest for 5 minutes before serving.

Jumat, 14 Desember 2012

Recipe Swap: Balsamic Parmesan Asparagus

I love asparagus. It's one of my all-time favorite vegetables and I can't get enough of it in early spring when it's in season. The theme for this week's recipe swap was Side Dishes and when I did the swapping and ended up with Katie's Balsamic Parmesan Asparagus I felt like I'd hit the jackpot.

Balsamic Asparagus

The original recipe says this feeds 8-10 people as a side dish but that must not be for true asparagus lovers like us. My two bunches were a little over 2lbs and the two of us polished it off between dinner and leftovers for lunch the next day. Maybe someday Baby Girl will realize how awesome asparagus tastes and like more than just snapping the ends off and tossing the spears with oil and seasoning.


My spears were so thin I skipped the blanching step altogether, opting to let them roast in the oven. The balsamic drizzle was a delicious finishing touch. Definitely take the recipe's advice and open your windows. Even though it was a brisk night I had the kitchen window and the back slider open for a cross breeze, as well as the ceiling fan on in the living room and the exhaust fan on over the stove. There's nothing like inhaling a big ol' whiff of boiling vinegar - it's not pleasant so don't do it!

Thanks for a delicious recipe, Kate!

Balsamic Parmesan Asparagus
As seen on Kate's Recipe Box, originally from Leite�s Culinaria

1/2 cup balsamic vinegar or a few drops top-notch balsamic vinegar
1 tablespoon salt, plus more to taste
2 lbs. asparagus, tough ends snapped off
1/4 cup olive oil, divided
1 cup (about 4oz.) freshly grated Parmigiano-Reggiano cheese

Preheat the oven to 350.

If using top-notch balsamic vinegar, skip this step. Otherwise, open a window and turn on the exhaust fan. Put the vinegar in a small saucepan and bring to a boil over medium-high heat. Reduce the heat and simmer, swirling the pan occasionally, until the vinegar is reduced by half, anywhere from 7 to 15 minutes, depending on the size of the saucepan. Remove from the heat.

Bring a pot of water to boil. Add 1 tablespoon of the salt and the asparagus and blanch until barely tender, about 1 minute for spears of average thickness, more for thicker spears. Skip this step if you have pencil-thin spears. Drain and rinse under cold water to stop the cooking. Pat the asparagus dry with paper towels. (You can keep the asparagus at room temperature or refrigerate it for up to several hours.)

Place the asparagus in a single layer on a rimmed baking sheet. Add salt to taste, drizzle with 2 tablespoons of the oil, and toss to coat. Sprinkle the asparagus with the Parmigiano-Reggiano cheese. Bake until the spears are tender and the cheese is browned and almost bubbling (it won�t actually melt), about 5 minutes.

Transfer asparagus to a platter. Drizzle with the reduced balsamic vinegar or a few drops of the really top notch stuff. Serve immediately.

Click the links below to see side dishes made by my fellow swappers.


Selasa, 21 Agustus 2012

Sweet Corn with Zucchini and Basil


Once again I found myself with a few ears of corn and no idea what to make. Thankfully Nichole had just posted this recope for Fried Sweet Corn with Basil Butter. I also had half a huge zucchini to use up, so I decided to add it to the corn to bump up the veggies.

Sweet Corn with Zucchini and Basil
Slightly modified from The Cookaholic Wife

1/2 large zucchini (or 1 small zucchini), shredded
2 tablespoons unsalted butter
3 cups corn kernels (about 4 ears)
2 cloves garlic, minced
1/4 cup fresh basil leaves, minced
Salt and pepper

Place shredded zucchini in a bowl. Sprinkle with salt and allow to sit for 10-15 minutes. Transfer zucchini to a clean kitchen towel and wring out all the moisture.

In a large skillet melt the butter over medium heat. Add the corn, zucchini, garlic and basil and cook, stirring frequently for about 5 minutes or until the corn is lightly browned and making popping noises.

Transfer to a dish, season with salt and pepper to taste. Serve.

Senin, 23 Juli 2012

Recipe Swap Roundup - Vegetarian Part 2

Nicole isn't usually a fan of eggplant, but this Spicy Eggplant hit the spot after a long day:


I was skeptical of the blue cheese in tomato sauce but my Pasta with Tomato-Blue Cheese Sauce ended up being delicious:


Heather enjoyed how the flavors blended together in her Zucchini, Squash, and Tomato Gratin:


Dawn's Summer Vegetable Pie was the essence of summer in a pie:


Elisha isn't normally a fan of quinoa but she ended up really liking her Quinoa with Roasted Garlic, Tomatoes, and Spinach:


Christine loves spinach and artichoke dip but felt her Spinach and Artichoke Stuffed Portabellas was missing a little something, though nothing a little tweaking can't fix:


Nichole loved her Sauceless Garden Lasagna despite the fact that her husband won't eat zucchini or tomatoes:


Lindsay was excited when she saw Black Bean Patties with Corn Relish and Avocado Cream in her Inbox. They turned out to be delicious:


Kate was worried that making Homemade Manicotti would be too difficult but it was surprisingly easy and tasty:


Stefanie really enjoyed her Chili Lime Tofu despite being nervous about cooking tofu:


Ali made Jaida's Black Bean and Avocado Quesadillas. She doesn't have a blog so here is her review: I enjoyed this quesadilla. I cooked it on my panini press rather than in the pan. I find that it just cooks faster and crispier. Overall a great recipe that I'll make again but I will add something else for texture. I didn't add anything this time as I didn't want to change the recipe but perhaps some grilled chicken or crisp peppers. It needed some texture on the inside as the combination of avocado, black beans and cheese is pretty uniform. Delicious none the less and a fun first swap!


Mary Ellen was happy to find a healthier recipe for Lightened-up Eggplant Parm


Jenni also made Eggplant Parmesan, although this version isn't breaded:


Jenna used her Black Bean and Corn Dip to make tacos with sweet potatoes:


Jaida's Warm Chickpea Salad was a great light lunch:


Jey loves burgers and her Black Bean and Corn Burgers were a hit:


Nicole had to turn her enchiladas into a Veggie Enchilada Bake, but the flavors were still great:


Kristina wasn't able to use round pasta for her aptly named dish, Round Pasta, but she still enjoyed it:


Ashley enjoyed her Black Bean Salsa as a light summery salsa:

Kamis, 31 Mei 2012

Tomato & Cucumber Salad

Since Memorial Day weekend was also Baby Girl's baptism, we decided to keep things very, very low-key on Monday so we could rest and relax after a weekend of go, go, go. I knew I wanted to make my all-time favorite potato salad but I was also in the mood for something new. Jaida made this recipe for Tomato & Cucumber Salad for the recent BBQ swap so I decided to give it a shot.


I cut the recipe in half because SP isn't really a fan of cucumbers and because I had a feeling it wouldn't keep well. I should have scaled it back even further because I was the only one who ate it and there was just too much of it. I really liked the flavor and acidity from the vinegar so I'd make it again to bring to a cookout with more people.

Tomato & Cucumber Salad
Sweet Beginnings

1 cucumber, peeled, halved lengthwise, seeded and sliced
1/6 cup red wine vinegar
1/2 tablespoon white sugar
1/2 teaspoon salt
1/2 container of plum or cherry tomatoes, cut into halves
1/3 cup coarsely chopped red onion
1 1/2 tablespoons olive oil
Salt and pepper to taste

In a large bowl, combine the cucumber, vinegar, sugar and salt. Let stand at room temperature for an hour, stirring occasionally.

Add tomatoes, onion, and oil to cucumbers and toss to blend. Season to taste with salt and pepper.

Rabu, 30 Mei 2012

Penne with Chicken and Vegetables in Roasted Garlic Cream Sauce


You all know how much I love pasta and cream sauces. But those two things don't always fit into my plan to eat healthier and lose weight. Thankfully Jessica's recipe for Penne with Chicken and Vegetables in Roasted Garlic Cream Sauce combines healthy vegetables with a cream sauce made with milk instead of heavy cream. And it's delicious to boot.


I roasted the chicken and garlic in the morning and the house smelled fantastic. I couldn't wait for dinner. If you're able to prep all the vegetables in advance, as well as roast the chicken and garlic, this takes next to no time to cook. I made the sauce while the pasta cooked and then tossed it all together when SP got home. Baby Girl did eat one piece of chicken but the kid is such a carbaholic that the pasta was her main focus.

Penne with Chicken and Vegetables in a Roasted Garlic Cream Sauce
Very Slightly Modified from Sunny Side Up in San Diego

1 head of garlic - roasted with salt, pepper, and olive oil
1 tablespoon butter
1 tablespoon olive oil
1 small-medium zucchini, chopped
1 red bell pepper, chopped
1/2 onion, chopped
4-5 button mushrooms, chopped
Salt and pepper, to taste
1 1/2 cups milk
1 tablespoon corn starch
1/2 cup shredded Parmigiano Reggiano, plus more for topping
1-2 chicken breasts (depending on how much chicken per serving you want), roasted and sliced
12 oz. penne pasta
Fresh chopped basil for garnishing

Preheat oven to 375. Cut the top off of a head of garlic to expose the tops of cloves. Place on a sheet of aluminum foil, sprinkle with salt and pepper, and drizzle with olive oil. Loosely wrap the aluminum foil around the garlic, pinching the seams to seal. Roast for 45 minutes to an hour, or until the cloves are tender and start to turn golden brown. Allow to cool, then squeeze the roasted garlic out of the cloves and mash with a fork.

While the garlic is roasting, drizzle the chicken breast with olive oil, sprinkle with salt and pepper, cover loosely with aluminum foil, and add to the oven with the garlic. Roast for about 30 minutes until cooked through. Allow the chicken to rest, covered with aluminum foil, until you're ready to serve, then cut into slices.

Bring a pot of water to a boil. Cook penne until al dente then drain, reserving 1/2 cup of the cooking water.

While the pasta is cooking, whisk together the milk and corn starch in a glass measuring cup, set aside. In a large skillet over medium-high heat, heat the olive oil and butter. Add the onion, zucchini, bell pepper, and mushrooms. Cook for 8-10 minutes, stirring often, or until the vegetables soften and the onions are translucent. Season with a little salt and pepper. Add the roasted garlic to the skillet and mix into the vegetables.

Create a well in the skillet by pushing the vegetables to the edges, slowly stream in the milk/cornstarch mixture, whisking constantly. Work the vegetables into the sauce with the whisk then reduce the heat to low and simmer for 3-5 minutes. Stir in the Parmesan, then cook for another 3-5 minutes, or until the sauce begins to thicken and coat the back of the spoon. Taste and season with additional salt and pepper if necessary. Add the cooked pasta to the skillet and stir to coat. If the sauce seems too thick, add the reserved cooking liquid a tablespoon at time until you get the desired consistency.

Top each portion with the sliced chicken, extra Parmesan, and fresh chopped basil.